Table of Contents
Quick Intro

You can turn the TV on and off using the special “Turned Off” option. If your TV supports the CEC Option (*check the info below) and is enabled in your TV’s settings, you can directly assign the “Turned Off” option to your device as Default Content.

How to schedule the Turned Off option
You can create a new schedule and add an entry for the “Turned Off“. Whenever this option is scheduled, the TV will be turned off.
Option 1
The TV will turn on again when the scheduled “Turned Off” ends. You can create a schedule with the “Turned Off” option, for example, daily, from 9 p.m. to 9 a.m. the next day. You can assign it to your screen and the default content you want to display from 9 a.m. to 9 p.m.

You can reverse the above example configuration with the same results.

Option 2
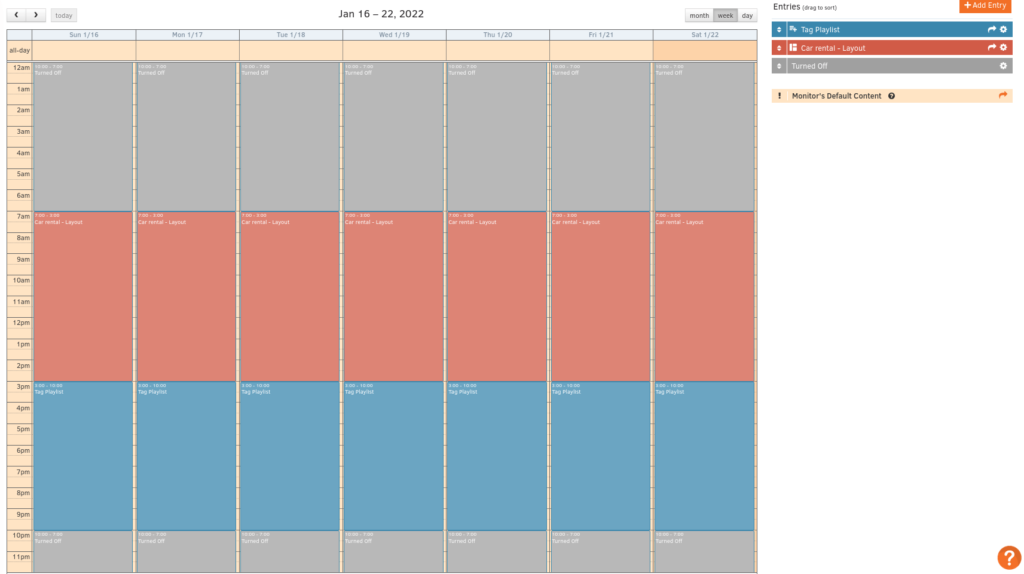
Another option is to schedule everything throughout the day without relying on the combination of a schedule and default content. Since schedules override default content and our schedule covers the whole day, the TV will display only what is scheduled.

From the above example:
- Added “Turned Off” option, which will turn off the TV from 22:00:00 to 07:00:00
- Added “Car rental – Layout”, which will play from 07:00:00 to 15:00:00
- Added “Tag Playlist”, which will play from 15:00:00 to 22:00:00
- The “Turned Off” option will start again at 22:00:00
Tests to check if your TV supports CEC
Before starting testing, ensure the following:
⚠️IMPORTANT
- Ensure that your TV has the CEC enabled.
- Note: This feature may use a different name depending on the manufacturer of your TV. Please visit their website for specific names or unique brand instructions.
- Ensure your HDMI cable is plugged into the CEC support HDMI port on your TV screen.
- Note: Some TVs may support CEC only through specific HDMI ports. Check your device documentation.
- If another device is between the player and your TV, try plugging your player directly into your TV instead.
- Note: Some devices will “pass through” CEC commands from the player to your TV, but others may interfere with CEC data.
- Be sure you are using cables certified for HDMI High Speed or HDMI Premium, or you are using the HDMI cable you got along with your player.
- Try power cycling your player by unplugging it from its power source, waiting for a few minutes, and then plugging it back in.
Running the 1st test
Connect your TV via HDMI cable with the Yodeck player. Try visual contact with your TV screen and follow the actions below. Assuming that your TV is on, try to turn it off using the Actions button in the screen details screen:

Try to turn on your Screen again.
If your TV is not responding to the two aforementioned commands, your TV is probably not supporting a CEC client, and therefore, your TV cannot be turned off and on by the player.
On the other hand, if the TV has successfully obeyed the two aforementioned commands, you can proceed with the 2nd test below.
Running the 2nd test
If the 1st test was successful, create a test schedule on your account with the “Turned Off” option.
Assign a simple media file to your screen, and create a schedule with a 5-minute “Turned Off” option.
While you are in front of the TV, check if the TV responds to the schedule you created (remember to plan ahead of the current local time).

If this test is completed successfully, your TV supports the CEC client, and your player can interact directly with your TV via the HDMI cable.
CEC Compatibility
The Yodeck Player (or Raspberry Pi) generally includes a CEC adapter on its HDMI screen/monitor port. CEC is a standard communication protocol supported by most major TV manufacturers. It allows a playback device (Yodeck Playbox) to power on, off, and switch video inputs on a CEC-enabled TV. Check out the CEC compatibility chart. If your screem/monitor does not support CEC (e.g., you have a computer monitor), the Yodeck Raspberry Player turns off the HDMI port to allow it to turn off. This function is supported by all current computer monitors, even some TVs. CEC is not supported if you use a PC as the Yodeck player.
The software will attempt to turn off or change the HDMI/VGA port, but your hardware might not support this. The same goes for your Yodeck Player if you use an HDMI-to-VGA adapter. In the future, we will support using infrared LEDs to signal the screen/monitor on or off through IR, just like normal TV remotes do. We can support custom solutions for large installations, like the above, or use custom serial connections to screens/monitors. We will also provide programming hooks that allow you to create custom scripts to power your screen/monitor on/off.
Manufacturer CEC Specification list
- Anynet+ (Samsung)
- Aquos Link (Sharp)
- BRAVIA Link and BRAVIA Sync (Sony)
- HDMI-CEC (Hitachi)
- E-link (AOC)
- Kuro Link (Pioneer)
- INlink (Insignia)
- CE-Link and Regza Link (Toshiba)
- RIHD (Remote Interactive over HDMI) (Onkyo)
- RuncoLink (Runco International)
- SimpLink (LG)
- T-Link (ITT)
- HDAVI Control
- EZ-Sync
- VIERA Link (Panasonic)
- EasyLink (Philips)
- NetCommand for HDMI (Mitsubishi).
Need Help?
The Yodeck Support Team can help you out! Log in to your Yodeck account and send us a message from the bottom right corner!